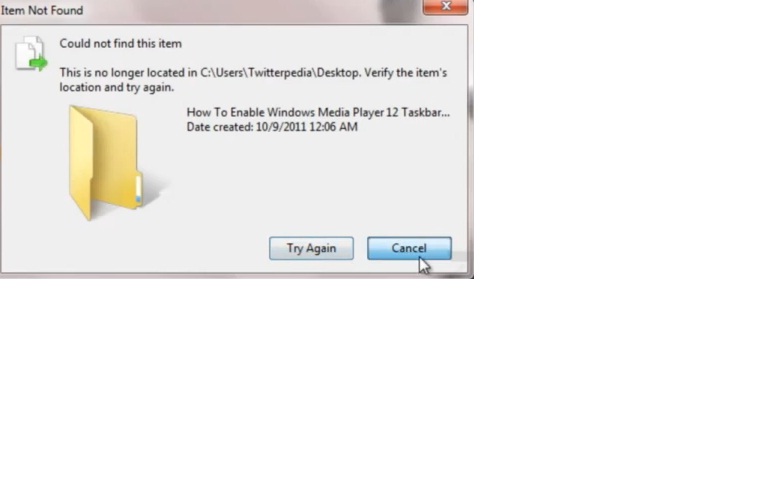
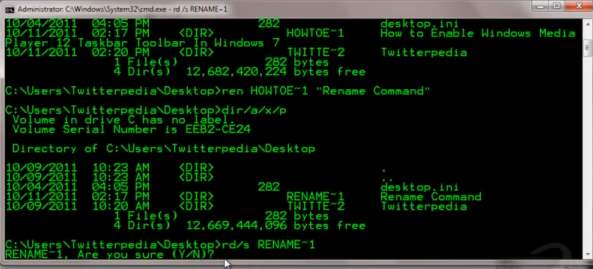
1.The Only way to fix this is delete the folder from the command prompt with administrator privileges
2.Navigate to the folder that the object reside in. (cd %userprofile%\Desktop)..


2. How to reset TCP/IP in Windows or How to delete TCP/IP entries from Registry ?
Resetting TCP/IP solves many problems. So how to reset it ?Actually all the parameters of the TCP/IP for every interface is stored in Windows Registry Database. Its not stored in a single location, but in many locations. So finding all the values and deleting them manually is not at all possible. It may disturb our system configuration if you edit the registry manually. My sincere request is backup your system registry before you modify anything, otherwise you will get lot of issues. :)
So to simplify this situation, we have a command in windows, which takes care of everything in resetting tcp/ip. Finally the beautiful command is “netsh”. It really helps us in many conditions. And it can be available as a download from microsoft.com for older machines.
How to work with it ?
1. Apply command netsh at the command prompt.
2. Type interface command at netsh> prompt
3. Type ip command at netsh interface> prompt
4. Type reset reset.txt command, to reset the tcp/ip.
But here what is reset.txt, we are just sending the output details to that file, if anything goes wrong you can get back to your previous config from this file.
5. Go and look at your tcp/ip properties tab, you will set to “Obtain Automatically Mode”, surprised!!!
6. This command is used in situations like follows….
sometimes DNS servers information will not erase from the registry
sometimes virtual ip settings also not erase from the registry
sometimes configuration changes doesn’t takes place
How to Fix Temporary Profile in Windows 7
Why Windows 7 Loads with Temporary Profile?
Obviously, your profile (the files and folders located under C:\Users\user_name) is corrupted. There is another chance which is a delay in reading your profile files due to Antivirus scan or something else during boot up. Usually after typing your user name and password Windows tries to read and load your profile, if it gets corrupted or delay in reading, Windows will load with temp profile to give temporary access on computer
How to Fix Windows 7 Temp Issue on Workgroup and Domain Environment
1) Before do anything, restart the computer 2 or 3 times to see whether it’s going back to your old correct profile. Go to next step if this doesn’t work.2) Rename the temp profile registry and revert back the old registry settings for the correct profile. This method works most of the time for me in Workgroup and domain environment.
a) Log in with temp profile.
b) Start registry editor by typing regedit in find box of Windows 7.
c) Navigate the following location.
d) You will see similar keys under profile list, but one with .bak, as shown below.
e) The key with .bak is for the correct old profile. Currently your Windows 7 computer logged in with fresh (temporary) profile with same key. So, rename the new profile key ( which is not having.bak) and remove .bak from correct profile key. See below.
f) That’s it. Log off and log in (or restart) with your user name and password. You must get your correct profile with icons and profile settings back in Windows 7, if you are lucky enough.
Still if Windows 7 computer loads with temporary profile and creates a registry key with .bak, that means user profile is really corrupted and Operating System is not reading it properly.
3) Few times this method worked for me, repair the corrupted files. Usually the corrupted ‘Ntuser’ files cause this issue. So, run the check disk for partition which is having user profile. After restarting for check disk, if you see corrupted entries and repairing process inside your user profile folder, then you can hope for good news here. If it finds and repairs any files especially Ntuser files, you may get your old Windows 7 profile back.
If above steps do not help you out, then we need to create a new profile with new user name.
Basically we need to create a new user account, login with it and transfer the data from old user profile to new user profile. It is easy in workgroup environment as you can create new user name locally, but it is tricky in domain environment. Because, the existing user account is already there on domain server and nothing wrong with it. Also, creating a new different domain user account will cause issues on corporate emails, domain groups membership and shared permissions.
So, we need to treat both cases separately.
4) Create new user name in non domain (workgroup environment) from control panel or computer management. Make sure to add the new user to administrators group.
Login with new user name and start copying your old data from old profile. I normally copy below data,
a) My Documents (Music, videos and downloads)
b) Desktop
c) Favorites
d) Any outlook PST files (find more information about location of PST files here)
But Microsoft suggests to copy entire old user profile (except 3 files) as shown in this official site link.
5) New user profile in domain environment.
Since we can’t delete and create new domain user account for this purpose, we will play around with client computer only. Let’s completely remove the user profile and re create again.
Copy the important user data (a to d in above step 4) or entire folders from corrupted profile to new location. Double-check that you have copied all required folders and files from old profile, because we are going to delete it now.
Go to Advanced settings of System as shown below, click on Settings (user profiles), select the corrupted user profile which is not loading properly in Windows 7, then press Delete button. Delete button will be enabled only if you login with different user account.
This will remove the entire user profile and related user SID from computer including the registery keys we talked about earlier. You can cross check the proper removal of user account (SID) by checking the C:\Users folder. Once it is remove properly, restart the computer and login with same user name (which was not loading earlier). The computer should create a new user profile as this is the first time the user is logging on. You need to copy back your old important data to new profile and set email outlook etc..if required.
I hope these tips help to fix temporary profile issue on Windows 7.
NTLDR is Missing" for Win XP
If you get the "NTLDR is Missing" error, follow these instructions:
1. Load Windows XP CD into CD drive.
2. Make sure BIOS is set to boot to CD drive.
3. Boot the computer from CD.
4. At menu, press "R" to load Recovery Console.
5. Select the installation to be fixed.
*The following instructions assume CD-ROM is labeled as drive D and the hard drive partition the windows installation is on is labeled as drive C. Replace the letters accordingly.
6. Type "COPY D:\i386\ntldr C:\" and press ENTER.
7. Type "COPY D:\i386\ntdetect.com C:\" and press ENTER.
8. Remove CD and type "EXIT" and press ENTER (to reboot your computer).
6.CD/DVD detected in BIOS, not windows?
Windows Vista
- Click Start, and then click All Programs.Collapse this image
- Click Accessories, and then click Run.
- Type regedit, and then click OK. If you are prompted for an administrator password or for a confirmation, type the password, or click Allow.Collapse this image
- In the navigation pane, locate and then click the following registry subkey:HKEY_LOCAL_MACHINE\SYSTEM\CurrentControlSet\Control\Class\{4D36E965-E325-11CE-BFC1-08002BE10318}
- In the right pane, click UpperFilters.
Note You may also see an UpperFilters.bak registry entry. You do not have to remove that entry. Click UpperFilters only. If you do not see the UpperFilters registry entry, you still might have to remove the LowerFilters registry entry. To do this, go to step 8. - On the Edit menu, click Delete.
- When you are prompted to confirm the deletion, click Yes.
- In the right pane, click LowerFilters.
Note If you do not see the LowerFilters registry entry, unfortunately this content cannot help you any further. Go to the "Next Steps" section for information about how you can find more solutions or more help on the Microsoft Web site. - On the Edit menu, click Delete.
- When you are prompted to confirm the deletion, click Yes.
- Exit Registry Editor.
- Restart the computer.
Windows XP
- Click Start, and then click Run.
- In the Open box, type regedit, and then click OK.
- In the navigation pane, locate and then click the following registry subkey:HKEY_LOCAL_MACHINE\SYSTEM\CurrentControlSet\Control\Class\{4D36E965-E325-11CE-BFC1-08002BE10318}
- In the right pane, click UpperFilters.
Note You may also see an UpperFilters.bak registry entry. You do not have to remove that entry. Click UpperFilters only. If you do not see the UpperFilters registry entry, you still might have to remove the LowerFilters registry entry. To do this, go to step 7. - On the Edit menu, click Delete.
- When you are prompted to confirm the deletion, click Yes.
- In the right pane, click LowerFilters.
Note If you do not see the LowerFilters registry entry, unfortunately this content cannot help you any further. Go to the "Next Steps" section for information about how you can find more solutions or more help on the Microsoft Web site. - On the Edit menu, click Delete.
- When you are prompted to confirm the deletion, click Yes.
- Exit Registry Editor.
- Restart the computer.
WINDOWS
7,WINDOWS VISTA
ERROR
- All my programs and .exe files on windows open in media player
SOLUTION
STEP1:
Click->All programs->notepad
STEP2:
- Open a notepad copy & paste below the text
Windows
Registry Editor Version 5.00
[HKEY_CURRENT_USER\Software\Microsoft\Windows\CurrentVersion\Explorer\FileExts\.exe]
[HKEY_CURRENT_USER\Software\Microsoft\Windows\CurrentVersion\Explorer\FileExts\.exe]
[HKEY_CURRENT_USER\Software\Microsoft\Windows\CurrentVersion\Explorer\FileExts\.exe\OpenWithList]
[HKEY_CURRENT_USER\Software\Microsoft\Windows\CurrentVersion\Explorer\FileExts\.exe\OpenWithProgids]
"exefile"=hex(0):
STEP3:
Select
All Files in the Save
as type list, and then type Exe.reg in the
File name box.
STEP4:
- Select Unicode in the Encoding list. Save it and remember the file location.
- Save the file as fix.reg on desktop and run the file.
- You may have to restart the computer to restore the program icons to their original appearance.
NOTE:
- After the problem is resolved, delete the Exe.reg file so that it is not mistakenly added back to the registry at a later date.
Steps for solve the shortcut virus:-
- Click on Start and open the Run mode.
- In the run mode, type cmd and click on [OK] to open the command prompt.
- Now, type the following code in the command prompt:-
attrib -h -r -s /s /d x:\*.*
where 'x' must be replaced by the drive letter of the pen drive. - Now, go to the flash drive and check if all the files or folders are back.
- After that, download the Malwarebytes' Anti-Malware
Sometimes you cannot open the notepad in system when you get this error .So create the file in any other system then run that file in problem occur system.
Switch AHCI TO IDE (Tutorial HowTo) !!!
Welcome all , so let me explain I installed Windows 7 With AHCI set from Bios , but after that i wanted to use ide (becose it boots faster) and when i set Ide from Bios , the windows 7 loading screan camed upp and BSOD (Blue screen of death) with an error code 0x0000005B , i tryed the regedit trick by setting in the "HKEY_LOCAL_MACHINESystemCurrentControlSetServicesMsahci" and then in the right pan the START value from 0 i set it to 1 and it supposed to be working but it was a failiure , it still did the Bsod and i was so pissed of , i wanted to make it work ... AND I DID IT !
Here are the pases :
1) I assume u have installed Windows Vista or Windows 7 with AHCI set from BIOS !
2) Download my registry fix (to add the ide keys to regeditor) simply apply the key
3) Now the manually regedit part Go to :
HKEY_LOCAL_MACHINE_System_CurrentControlSet_Services_Msahci
HKEY_LOCAL_MACHINE_System_CurrentControlSet_Services_iaStor
HKEY_LOCAL_MACHINE_System_CurrentControlSet_Services_iaStorV
And in thease three keys in the right pan u will find a key named "START" change at all three (Msahci,iaStor,iaStorV) values from 0 To 1
Now navigate to HKEY_LOCAL_MACHINE_System_CurrentControlSet_Services_PciIde
,then change the start value to "0"
4) Now u are allmost done , restart your computer/laptop , and go to Bios and set from AHCI to IDE !!! , save settings in Bios and restart
5)Windows will be loading , and VOILA !!! NO BSOD !!! , windows Vista/Seven will install new Ide drivers and u will see in windows device manager that you dont have AHCI drivers anymore , u have Ide drivers !
6)It will prompt for another restart , just restart it and u will be happy
Credits goes for ME ! ONLY ME !!!!! , i searched all the internet and i couldn`t find something like this , so i began from literally everything to everything , a LOT OF REBOOTS AND BSOD`s believe me it was a pain in the ass !
But i done it !, now im ussing Windows 7 With ide mode ...
Every article on the internet when i searched it sayd : Change from the Msahci the start key to 1 if u want to make it boot from ide , but no it is much much more !
For some people it works like that , for some people it doesn`t.
I hope u enjoyed..........AHCI vs IDE
AHCI and IDE are two modes in which a hard drive communicates with the rest of the computer system using a SATA storage controller. SATA hard drives can operate in a backward-compatible PATA/IDE mode, a standard AHCI mode or vendor-specific RAID. AHCI stands for Advanced Host Controller Interface and is a faster mode of operation compared to IDE. RAID mode also enables and makes use of AHCI.
AHCI gives software developers and hardware designers a standard method for detecting, configuring, and programming SATA/AHCI adapters. AHCI is separate from the SATA 3 Gbit/s standard, although it exposes SATA's advanced capabilities (such as hot swapping and native command queuing) such that host systems can utilize
LoopBack Wiring :
green+white orange
white green + orange
Robo Copy:
* Install Windows Resoure kit
robocopy "\\172.17.0.53\Server2\Vam" "E:\ProcessBackup\Vamprocess" /S /SEC /copyall /XF *.wav *.gsm /V /NP /W:1 /R:1 /LOG:"D:\robo\Vam.txt"
----------------------------------------------------------------------------------------
With mail authentication Please use this script
d:
cd Putty
ROBOCOPY D:\Putty P:\ /E /XO /W:1 /R:2 > d:\log.txt
e:
cd test
ROBOCOPY e:\test P:\ /E /XO /W:1 /R:2 > d:\log1.txt
ECHO Backup Complete
D:
cd /
cd sendEmail-v156-notls\
sendEmail.exe -f ranjithkumar.t@Ranjiththulasi.com -t ranjithkumar.t@Ranjiththulasi.com -u Backup Completed -a d:\log.txt -a d:\log1.txt -m Someone just Backup Done! -s Mail.Ranjiththulasi.com:8080 -xu ranjithkumar.t@Ranjiththulasi.com.com -xp neW@13
Pause
Release and renew IP address:--
To release and renew your IP address:
- Go to "Start > Run" and type "cmd" (no quotes), then select "OK"

- Type "ipconfig /release" (no quotes) and press "Enter"

- Once the prompt returns, type "ipconfig /renew" (no quotes), then hit "Enter,"

- Finally, type "exit" (without quotes) then press "Enter" to close the window

How to remove Active Desktop Recovery screen
- Go to Run and type regedit
- Now navigate to this path – HKEY_CURRENT_USER\Software\Microsoft\Internet Explorer\Desktop\SafeMode\Components
- You would find a key named DeskHtmlVersion
- Right click the key and select Modify
- Under the label Base, select the radio button Decimal
- Change Value data to272
- Click OK
This should do the trick. If the screen doesn’t go then try restarting your PC for the changes to take effect.
IP Address - 192.168.1.112/24
ரஞ்சித்துளசி...
Setting your IP manually in Linux:-
We will first set up the networking manually.
In the following example we will assume the following addresses and their purpose
IP Address - 192.168.1.112/24
   Default Gateway -  192.168.1.1
   DNS server      -  192.168.1.1
In order to set these up we will run the following commands:
root@bt:~# ifconfig eth0 192.168.1.112/24
root@bt:~# route add default gw 192.168.1.1
root@bt:~# echo nameserver 192.168.1.1 > /etc/resolv.conf
Getting a static IP to stick between reboots
These settings however will only last until you reboot, so if we want to save them between reboots we need to edit the /etc/network/interfaces file like this:
# This file describes the network interfaces available on your system # and how to activate them. For more information, see interfaces(5). # The loopback network interface auto lo iface lo inet loopback # The primary network interface auto eth0 iface eth0 inet static address 192.168.1.112 netmask 255.255.255.0 network 192.168.1.0 broadcast 192.168.1.255 gateway 192.168.1.1Edit the file as appropriate, then have the network come up automatically at boot time:root@bt:~# update-rc.d networking defaults root@bt:~# /etc/init.d/networking restartGetting an IP from DHCP
In order to get an IP from a DHCP server we can issue the dhclient <interface> command as follows:root@bt:~# dhclient eth0 Internet Systems Consortium DHCP Client V3.1.1 Copyright 2004-2008 Internet Systems Consortium. All rights reserved. For info, please visit http://www.isc.org/sw/dhcp/ Listening on LPF/eth0/00:0c:29:81:74:21 Sending on LPF/eth0/00:0c:29:81:74:21 Sending on Socket/fallback DHCPREQUEST of 192.168.1.112 on eth0 to 255.255.255.255 port 67 DHCPACK of 192.168.1.112 from 192.168.1.1 bound to 192.168.1.112 -- renewal in 37595 seconds. root@bt:~#Using the script to start networking
There is a script to start networking in the /etc/init.d directory which attempts to start every interface listen in /etc/network/interfaces (you can remove the ones you don’t need). To start it issue the following command:root@bt:~# /etc/init.d/networking startHow to create a Password Protected Folder in Windows 7
This tutorial will guide you through the steps required to create a locked folder in Windows 7 – without installing any additional 3rd party software.9/27/15 Update: although the screenshots will be different, the method outlined in this tutorial to create a password protected folder does work in Windows 8.While the steps below will guide you in creating a hidden and password protected folder, this method is not 100% secure. It will deter the average computer user enough, but an advanced userwill be able to access the contents of this folder. If you want to create a truly secure and encrypted place to store files and folders that absolutely nobody will ever be able to access, see the tutorial How to Securely Store Files in Windows (which includes installing software, but it’s completely free).
- Create a new folder and name it whatever you would like.
- Open the folder, right-click on a blank area in it, then select New -> Text Document from the pop-up menu.
- Open the text file you just created by double-clicking it and copy/paste in the following text:
cls
@ECHO OFF
title Folder Private
if EXIST "Control Panel.{21EC2020-3AEA-1069-A2DD-08002B30309D}" goto UNLOCK
if NOT EXIST Private goto MDLOCKER
:CONFIRM
echo Are you sure you want to lock the folder(Y/N)
set/p "cho=>"
if %cho%==Y goto LOCK
if %cho%==y goto LOCK
if %cho%==n goto END
if %cho%==N goto END
echo Invalid choice.
goto CONFIRM
:LOCK
ren Private "Control Panel.{21EC2020-3AEA-1069-A2DD-08002B30309D}"
attrib +h +s "Control Panel.{21EC2020-3AEA-1069-A2DD-08002B30309D}"
echo Folder locked
goto End
:UNLOCK
echo Enter password to unlock folder
set/p "pass=>"
if NOT %pass%== 123456 goto FAIL
attrib -h -s "Control Panel.{21EC2020-3AEA-1069-A2DD-08002B30309D}"
ren "Control Panel.{21EC2020-3AEA-1069-A2DD-08002B30309D}" Private
echo Folder Unlocked successfully
goto End
:FAIL
echo Invalid password
goto end
:MDLOCKER
md Private
echo Private created successfully
goto End
:End- In the above code, replace the key PASSWORD_GOES_HERE with the password you want to use to unlock the folder. For example if you want the password to be 123456, the line should look like:
if NOT %pass%== 123456 goto FAIL- Save your new file in the .bat format with the complete file name being locker.bat. To do this, make sure to change the Save as type: to All Files (*.*).
- In the folder you created back in Step #1, double click the locker.bat file and there will now be a new folder named Private where you can put anything you want.
- Upon exiting, double click the locker.bat file again. It will prompt you to answer whether you want to lock your folder or not. Press Y and the private folder will disappear.
- In order to retrieve the Private folder, all you have to do is double click the locker.bat file and enter the password which you set in Step #4 and the folder will appear again for you to access.
 Again, this method is not truly secure. How to Securely Store Files in Windows will take you through the steps to create a really secure folder (using free software).


 click to enlarge
 click to enlarge
ரஞ்சித்துளசி...