This article helps you connect virtual networks by using the VNet-to-VNet connection type. The virtual networks can be in the same or different regions, and from the same or different subscriptions. When connecting VNets from different subscriptions, the subscriptions do not need to be associated with the same Active Directory tenant.




About connecting VNets
VNet-to-VNet
Configuring a VNet-to-VNet connection is a good way to easily connect VNets. Connecting a virtual network to another virtual network using the VNet-to-VNet connection type (VNet2VNet) is similar to creating a Site-to-Site IPsec connection to an on-premises location. Both connectivity types use a VPN gateway to provide a secure tunnel using IPsec/IKE, and both function the same way when communicating. The difference between the connection types is the way the local network gateway is configured. When you create a VNet-to-VNet connection, you do not see the local network gateway address space. It is automatically created and populated. If you update the address space for one VNet, the other VNet automatically knows to route to the updated address space. Creating a VNet-to-VNet connection is typically faster and easier than creating a Site-to-Site connection between VNets.
Site-to-Site (IPsec)
If you are working with a complicated network configuration, you may prefer to connect your VNets using the Site-to-Site steps instead. When you use the Site-to-Site IPsec steps, you create and configure the local network gateways manually. The local network gateway for each VNet treats the other VNet as a local site. This lets you specify additional address space for the local network gateway in order to route traffic. If the address space for a VNet changes, you need to update the corresponding local network gateway to reflect that. It does not automatically update.
VNet peering
You may want to consider connecting your VNets using VNet Peering. VNet peering does not use a VPN gateway and has different constraints. Additionally, VNet peering pricing is calculated differently than VNet-to-VNet VPN Gateway pricing. For more information, see VNet peering.
Why create a VNet-to-VNet connection?
VNet-to-VNet communication can be combined with multi-site configurations. This lets you establish network topologies that combine cross-premises connectivity with inter-virtual network connectivity,
The process involves the following steps:
- Create a VNet
- Add a gateway subnet
- Assign a public IP address
- Add a virtual network gateway
- Repeat steps 1 – 4 to create a second VNet
- Create a connection object that connects the two virtual network gateways
Create a new virtual network
- From a browser, navigate to the Azure portal and, if necessary, sign in with your Azure account.
-
Click +. In the Search the marketplace field, type "Virtual Network". Locate Virtual Network from the returned list and click to open the Virtual Network page.

Click +. In the Search the marketplace field, type "Virtual Network". Locate Virtual Network from the returned list and click to open the Virtual Network page.
3.Near the bottom of the Virtual Network page, from the Select a deployment model list, select Resource Manager, and then click Create.

On the Create virtual network page, configure the VNet settings. When you fill in the fields, the red exclamation mark becomes a green check mark when the characters entered in the field are valid. There may be values that are auto-filled. If so, replace the values with your own. The Create virtual network page looks similar to the following example:

- Name: Enter the name for your virtual network.
- Address space: Enter the address space. If you have multiple address spaces to add, add your first address space. You can add additional address spaces later, after creating the VNet.
- Subscription: Verify that the Subscription listed is the correct one. You can change subscriptions by using the drop-down.
- Resource group: Select an existing resource group, or create a new one by typing a name for your new resource group. If you are creating a new group, name the resource group according to your planned configuration values. For more information about resource groups, visit Azure Resource Manager Overview.
- Location: Select the location for your VNet. The location determines where the resources that you deploy to this VNet will reside.
- Subnet: Add the subnet name and subnet address range. You can add additional subnets later, after creating the VNet.
2. Add additional address space and create subnets
You can add additional address space and create subnets once your VNet has been created.
To add additional address space
- To add additional address space, under the Settings section on your virtual network page, click Address space to open the Address space page.
- Add the additional address space, and then click Save at the top of the page.

To create additional subnets
- To create subnets, in the Settings section of your virtual network page, click Subnets to open the Subnets page.
- On the Subnets page, click +Subnet to open the Add subnet page. Name your new subnet and specify the address range.

To save your changes, click OK at the bottom of the page.
3. Create a gateway subnet
Before creating a virtual network gateway for your virtual network, you first need to create the gateway subnet. The gateway subnet contains the IP addresses that are used by the virtual network gateway. If possible, it's best to create a gateway subnet using a CIDR block of /28 or /27 in order to provide enough IP addresses to accommodate additional future configuration requirements.
To create a gateway subnet
- In the portal, navigate to the Resource Manager virtual network for which you want to create a virtual network gateway.
- In the Settings section of your VNet page, click Subnets to expand the Subnets page.
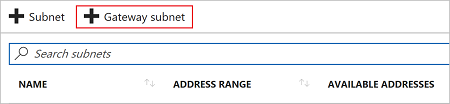
- On the Subnets page, click +Gateway subnet to open the Add subnet page.

4.The Name for your subnet is automatically filled in with the value 'GatewaySubnet'. This value is required in order for Azure to recognize the subnet as the gateway subnet. Adjust the auto-filled Address range values to match your configuration requirements, then click OK at the bottom of the page to create the subnet.

4. Specify a DNS server (optional)
DNS is not required for VNet-to-VNet connections. However, if you want to have name resolution for resources that are deployed to your virtual network, you should specify a DNS server. This setting lets you specify the DNS server that you want to use for name resolution for this virtual network. It does not create a DNS server.
- On the Settings page for your virtual network, navigate to DNS Servers and click to open the DNS servers page.

- DNS Servers: Select Custom.
- Add DNS server: Enter the IP address of the DNS server that you want to use for name resolution.
- When you are done adding DNS servers, click Save at the top of the page.
5. Create a virtual network gateway
In this step, you create the virtual network gateway for your VNet. Creating a gateway can often take 45 minutes or more, depending on the selected gateway SKU
To create a virtual network gateway
- In the portal, on the left side, click + and type 'virtual network gateway' in search. Locate Virtual network gateway in the search return and click the entry. On the Virtual network gateway page, click Create at the bottom of the page to open the Create virtual network gatewaypage.
- On the Create virtual network gateway page, fill in the values for your virtual network gateway.

On the Create virtual network gateway page, specify the values for your virtual network gateway.
- Name: Name your gateway. This is not the same as naming a gateway subnet. It's the name of the gateway object you are creating.
- Gateway type: Select VPN. VPN gateways use the virtual network gateway type VPN.
- VPN type: Select the VPN type that is specified for your configuration. Most configurations require a Route-based VPN type.
- SKU: Select the gateway SKU from the dropdown. The SKUs listed in the dropdown depend on the VPN type you select. For more information about gateway SKUs, see Gateway SKUs.
- Location: You may need to scroll to see Location. Adjust the Location field to point to the location where your virtual network is located. If the location is not pointing to the region where your virtual network resides, when you select a virtual network in the next step, it will not appear in the drop-down list.
- Virtual network: Choose the virtual network to which you want to add this gateway. Click Virtual network to open the 'Choose a virtual network' page. Select the VNet. If you don't see your VNet, make sure the Location field is pointing to the region in which your virtual network is located.
- Gateway subnet address range: You will only see this setting if you did not previously create a gateway subnet for your virtual network. If you previously created a valid gateway subnet, this setting will not appear.
- First IP configuration: The 'Choose public IP address' page creates a public IP address object that gets associated to the VPN gateway. The public IP address is dynamically assigned to this object when the VPN gateway is created. VPN Gateway currently only supports Dynamic Public IP address allocation. However, this does not mean that the IP address changes after it has been assigned to your VPN gateway. The only time the Public IP address changes is when the gateway is deleted and re-created. It doesn't change across resizing, resetting, or other internal maintenance/upgrades of your VPN gateway.
- First, click Create gateway IP configuration to open the 'Choose public IP address' page, then click +Create new to open the 'Create public IP address' page.
- Next, input a Name for your public IP address. Leave the SKU as Basic unless there is a specific reason to change it to something else, then click OK at the bottom of this page to save your changes.

- Verify the settings. You can select Pin to dashboard at the bottom of the page if you want your gateway to appear on the dashboard.
- Click Create to begin creating the VPN gateway. The settings are validated and you'll see the "Deploying Virtual network gateway" tile on the dashboard. Creating a gateway can take up to 45 minutes. You may need to refresh your portal page to see the completed status.
After the gateway is created, view the IP address that has been assigned to it by looking at the virtual network in the portal. The gateway appears as a connected device. You can click the connected device (your virtual network gateway) to view more information.
6.Create and configure TestVNet4
Once you've configured TestVNet1, create TestVNet4 by repeating the previous steps, replacing the values with those of TestVNet4. You don't need to wait until the virtual network gateway for TestVNet1 has finished creating before configuring TestVNet4. If you are using your own values, make sure that the address spaces don't overlap with any of the VNets that you want to connect to.
7. Configure the TestVNet1 gateway connection
When the virtual network gateways for both TestVNet1 and TestVNet4 have completed, you can create your virtual network gateway connections. In this section, you create a connection from VNet1 to VNet4. These steps work only for VNets in the same subscription. If your VNets are in different subscriptions, you must use PowerShell to make the connection. See the PowerShell article. However, if your VNets are in different resource groups in the same subscription, you can connect them using the portal.
- In All resources, navigate to the virtual network gateway for your VNet. For example, TestVNet1GW. Click TestVNet1GW to open the virtual network gateway page.

- Click +Add to open the Add connection page.

- On the Add connection page, in the name field, type a name for your connection. For example, TestVNet1toTestVNet4.
- For Connection type, select VNet-to-VNet from the dropdown.
- The First virtual network gateway field value is automatically filled in because you are creating this connection from the specified virtual network gateway.
- The Second virtual network gateway field is the virtual network gateway of the VNet that you want to create a connection to. Click Choose another virtual network gateway to open the Choose virtual network gateway page.
- View the virtual network gateways that are listed on this page. Notice that only virtual network gateways that are in your subscription are listed. If you want to connect to a virtual network gateway that is not in your subscription, please use the PowerShell article.
- Click the virtual network gateway that you want to connect to.
- In the Shared key field, type a shared key for your connection. You can generate or create this key yourself. In a site-to-site connection, the key you use would be exactly the same for your on-premises device and your virtual network gateway connection. The concept is similar here, except that rather than connecting to a VPN device, you are connecting to another virtual network gateway.
- Click OK at the bottom of the page to save your changes.
8. Configure the TestVNet4 gateway connection
Next, create a connection from TestVNet4 to TestVNet1. In the portal, locate the virtual network gateway associated with TestVNet4. Follow the steps from the previous section, replacing the values to create a connection from TestVNet4 to TestVNet1. Make sure that you use the same shared key.
9. Verify your connections
Locate the virtual network gateway in the portal. On the virtual network gateway page, click Connections to view the connections page for the virtual network gateway. Once the connection is established, you see the Status values change to Succeeded and Connected. You can double-click a connection to open the Essentials page and view more information.
When data begins flowing, you see values for Data in and Data out.


