Monday, 26 August 2013

How to add VMWARE ESXi 5.1 host to vCenter Server ?

Once you have installed the VMware ESXi 5.1 server, you need to add the server to existing VMware vCenter server to manage it .You can not use the VMware ESXi 5.1 host without adding to vCenter server.Once you have added the ESXi host to vCenter server, you can start creating  a virtual machines using the vSphere Client.In these virtual machines ,you can install most of the windows server operating systems,various Linux operating systems and Solaris X86 operating systems.
This article explains about how to add the ESXi 5.1 host to existing vCenter Server 5.1.
1.Open a VMware vSphere client 5.1 and connect to the vCenter server.


2.After logging to vCenter server ,you can see the below screen with instructions of adding ESXi hosts.
3.Create a new Datacenter to add the ESXi hosts in to that.The datacenter is nothing but collection of ESXi hosts. If you have ESXi hosts on different locations,Provide the meaning full name to the datacenter in vCenter.

4.Now our datacenter is ready .Here the datacenter name is UnixArena-DC .
5.Click on the "Add a host " link.Here you provide the ESXi host details and valid credentials to add it in vCenter. Click Next to continue.

6.In this screen you will get the summary of ESXi 5.1 host details and it's virtual machines.
Here i don;t have existing virtual machines on ESXi 5.1 host.
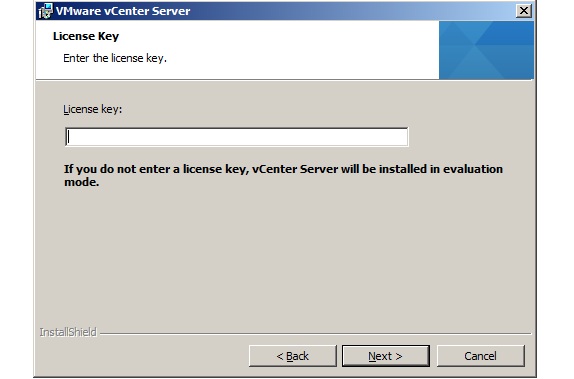
7.Add the valid license key .If you don't have a valid one ,just click next to continue to in Evaluation mode.

8.If you want to restrict remote users directly logging to this host,just enable lockdown mode.

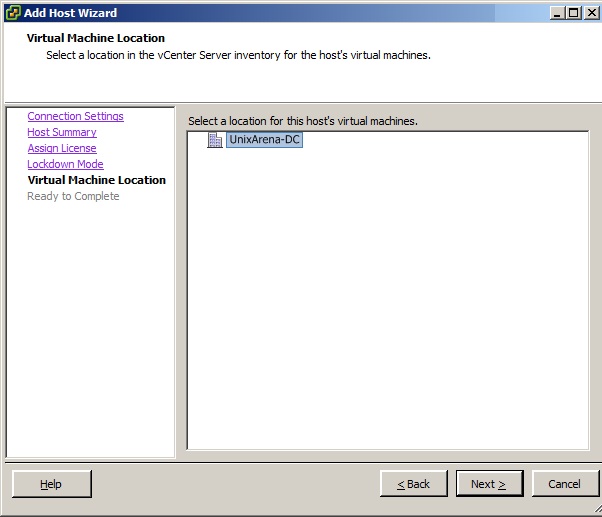
9.Select the virtual machines datacenter locations.

10.Click finish to complete the setup.
11. vCenter will take some time to add the ESXi host.Be patience.
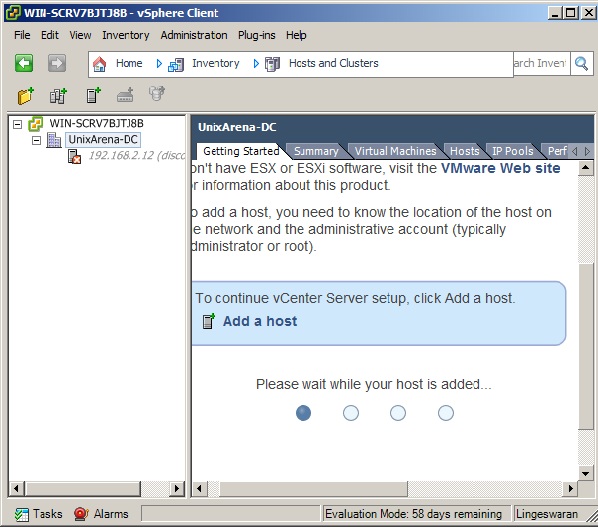
12.You have successfully added the ESXi host to vCenter server.Click on "Create a new virtual machine" to create new virtual server.
13.The below screen shows configured virtual machine with the name "Solaris 11- UnixArena" .
Thank you for reading this article.

VMware vCenter 5.1 Server Installation Step by Step Guide

Last week we have seen VMWARE ESXi 5.1 installation.After reading that article, VMWARE ESXi beginners wonders that what will be next step after installation of ESXi and how to manage it ? To manage vmware ESXi 5.1, you need to connect to VMware vCenter server. Here we will see the installation of vCenter server with step by step screenshots. vCenter 5.1 has lot prerequisite stuffs that you need to do before kicks of the actual vCenter Server installation.


Note:These step is exclusively for VMWARE ESXi 5.1 beginners to practice on their laptop or Desktop using vmware workstation and i had installed without configuring active directory on windows 2008 server.In my case,i have installed windows 2008 server on vmware workstation as guest and will be using this as vCenter server.

Note:
Before you installing this.we need to Enable & install IIS & .Net Via server manager windows server 2008

 
Login to windows 2008 server where you want to configure vCenter server. 


1.Copy the "VMware vCenter Server 5.1" directory to windows 2008 server and execute the Vmware-vcserver.exe file.You can also start the installation using auto-run file which also available in this directory. 


2.Select English and continue the installation.It will install Microsoft visual C++ libraries .


  3.After installing the Microsoft Visual C++ libraries ,vmware vCenter server installation will kick off.


4.Click next to continue the installation.


5.Accept the license agreement and continue the installation.


6.If you have valid license key for vCenter server,Just enter it .If you don;t have one just press "Next" to continue.(Evaluation period: 60days).


7. vCenter requires MySQL database to store the vCenter objects data.For smaller deployment ,you can use Microsoft SQL server 2008 express instance like the below screen.For larger deployments ,you need to provide the valid MySQL DSN names.

 
8.Create a new user account for vCenter server service to run or you can use windows server account by selecting Use SYSTEM Account.


9.If this the first vCenter server in your environment,select standalone Vmware vCenter Server instance.


10.Configure the ports according to your environment.It better to choose the default ports for the vmware services. 


11.Installer will automatically takes JVM memory size according to that Inventory size.Select the the one matching to your environment.


12.Provide vCenter Single Sign On information.


13. vCenter Server user/group name will be register with VMWARE vCenter SSO .
Here vCenter Server group name will be Administrators


14.Provide Vmware vCenter Inventory server information and Click Next to continue.


15.You can specify the installation location for vCenter server .


16.That's it.Just click "install" to install vCenter server now.


17.Click finish to complete the installation of vCenter server.


I was having small trouble while installing vCenter due to system resources and that's why there was some warning messages on the above screen.If you too get these kind of messages ,just re-run the same installer to install those missing components.


Finally rename the system name of the server and login with ad credential. using vSphere client


Saturday, 10 August 2013

Install VMware ESXi 5.1 with Screenshots

VMware ESXi is free. However, the software comes with a 60 days evaluation mode. You should register on VMware website to get your free license key to come out of the evaluation mode. Once the ESXi is installed, you can either user vSphere Client on the Direct Console User Interface to administer the host.

VMware ESXi is based on hypervisor architecture that runs directly on top of a hardware as shown below.

1. Download ESXi server

Get the software from the VMware ESXi download page.

Lets start now

Step1:

VMware VMvisor Boot Menu

1.Insert the VMWARE ESXi5.1 DVD and power on the server. ESXi installer will load the necessary files for installation.
 

2.Once all the modules are loaded successfully,you will get the below screen with server configuration.


3.Continue the installation by just pressing enter key.


4.By default,you have to accept the license to continue the installation by pressing F11.


5.Select the disk in which you would like to install VMWARE ESXi 5.1.It requires minimum 4~ to 5~GB disk space.Enter to continue.

6.Select the keyboard layout.Here i am selecting "US Default".


7.Its time to secure ESXi  by providing the complex root password.Enter to continue.


8. Here the Installer gathers the system information before start copying the files to the disk.

9.Here will be the final confirmation you need to give before destroying any data on that disk.Press F11 to continue the installation.

10.Installation begins.

11.Reboot the system to complete the installation.Make sure that you  have removed the installation media from the server.


      Some of the console message while rebooting the system


12.Now vmware EXSi 5.1 will boot from hard disk and you will get the below screen,once its completely up.

13.Many of them wonder that, how to login to the system. You can get login screen by just  pressing F2.

14.After logging to the system,you can see there are many options provided for configuring the ESXi and viewing the system logs.It also provided troubleshooting options as well.

That all from the VMWARE ESXi 5.1 installation part. Hope you liked it .
The next part will be installing http://ranjiththulasi.blogspot.in/2013/08/vmware-vcenter-51-server-installation.html to setup complete ESXi environment..


Thank you for reading this article.


ரஞ்சித்துளசி..