Controlling User Access
magine this – you have multiple users in your family sharing the same computer and operating system. You don’t want other users of the shared computer to run each and every program that’s installed in Windows 7. Some of the programs which you have installed require knowledge, and you don’t want your kids and other shared members to tinker with the application settings or change the configurations.
The ability to run selected programs for selected users can be achieved in two ways:
1. Choose The User account during Installation of the Application.
2. Tweak the Group Policy Editor and manually Add the Programs which shared users can run
We will discuss both of the above methods in full detail.
Important Note: First make sure that only you have the administrator account and the shared users have a limited user account in Windows7. If one or more of the other user accounts have administrator privileges, he/she might override the settings and configurations which you will create below.
Choose The User account during Installation of the Application
Windows 7 comes with a very useful User Account Control feature which allows you to define which user accounts should have the permission to run a program, when the program is being installed. When you are installing a new application, you will see the following two options:
Install this application for anyone who uses this computer (all users).
Install this application only for me.

If you don’t want other users of your shared computer to use the program you are installing, simply select the radio buttonOnly For me.
That’s it, now only you will be able to use, customize or remove that specific program in Windows7; other shared users will see the following prompt, when they try to run the program from their user accounts:
That’s it, now only you will be able to use, customize or remove that specific program in Windows7; other shared users will see the following prompt, when they try to run the program from their user accounts:
You don’t have the required permissions to run or remove this Application. Please contact the system administrator
Tweak the Group Policy Editor and manually add the programs which shared users can run.
Note: This section of this tip only applies to Professional editions of Windows. That includes Windows XP Pro, Windows Vista Pro, and Windows 7 Pro. This will not work on Home editions.
If you have already installed all the applications in your computer and don’t want to reinstall them with necessary permissions, you can manually add the programs from the Windows7 Group Policy Editor.Carefully follow the steps outlined below:
1. Click Windows 7 start menu and type gpedit.msc in the search box. When the search results appear, click the gpedit icon.

2. Clicking the gpedit icon will open Windows Group Policy Editor window.

3. In the left pane, navigate to User Configuration > Administrative Templates folder. You have to first click the small arrow placed next to the User configuration folder and then repeat the same thing for theAdministrative Templates subfolder
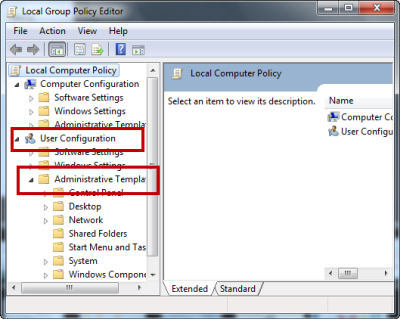
4. When you have reached the Administrative Templates subfolder, click the System subfolder on the left pane.

5. Now switch to the right pane and find the setting which says Run Only Specified Windows Applications.
The current setting for this key should be Not Configured, as shown below:

6. Right click that key and choose Edit

7. This will open a new window where you can define the programs and applications which will have the necessary user permissions.
When the window opens; first select the Enabled button at the top, as shown below:

8. Scroll down and hit the Show button next to List of allowed applications, this will open a small pop up window as shown below:

9. Now you have to type the name of the program which you want other users of the shared computer to be able to use. Type the name of all the common applications e.g. Word.exe, Excel.exe, Firefox.exe one by one in each of the following rows.

When you are done adding all the programs, hit the OK button. Next, hit the Apply button and close the Group Policy Editor window
That’s it, you have just defined the list of all the programs which other users of the same computer may use. Any program that’s not listed in the list of allowed applications will not have the necessary permissions and thus other users won’t be able to run it or entirely remove it from your computer.
Should you want to grant all users the ability to use all the programs installed on your computer, simply navigate to the above mentioned Group policy setting and disable the entire feature.
Education is the most important and powerful tool in this world. It's not about studying and only getting good marks. NCSR-Level-1 Exam Questions provides authentic IT Certification exams preparation material guaranteed to make you pass in the first attempt.
ReplyDelete